For Amiga 1000 owners, adding a SCSI hard drive has never been easier. The Amiga 1000 SCSI Sidecar project allows you to upgrade your system with a simple, effective SCSI bus interface that plugs into the sidecar bus port. This upgrade provides external storage capabilities, making it easier to store and access software, games, and files on your vintage machine.
Building the SCSI Sidecar: A Simple Fabrication Process
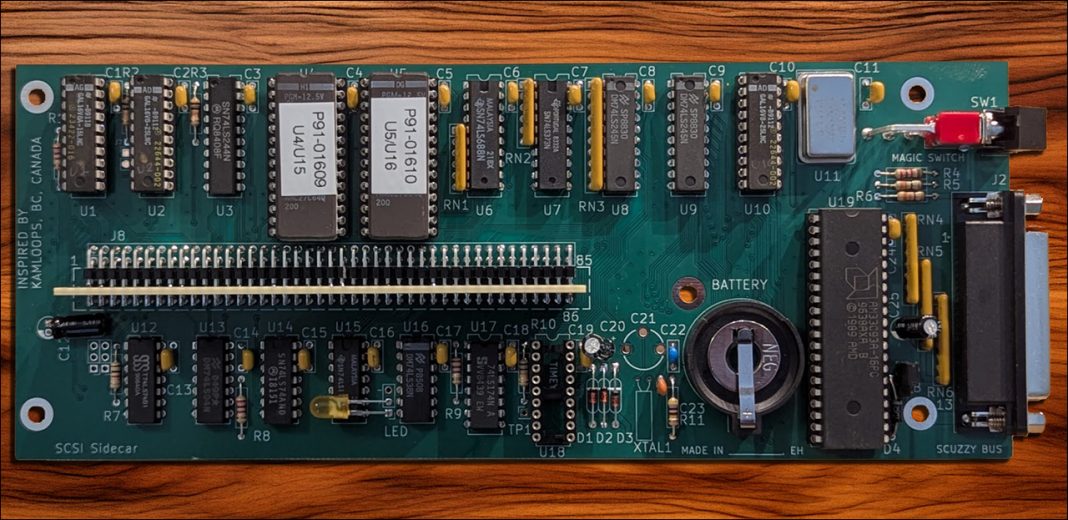
Fabricating the Amiga 1000 SCSI Sidecar is straightforward. The board features a 2-layer design, measuring 222mm x 89mm (8.75in x 3.5in). Key components include narrow and wide DIP sockets for the GALs and PROMs, along with an optional expansion edge for stacking additional devices.
The optional expansion feature allows users to add more peripherals. By creating a secondary circuit board and connecting a right-angle header, users can stack multiple sidecar adapters to expand their system’s capabilities. This makes the upgrade an excellent option for building a more versatile Amiga 1000 setup.
Programming PALs and EPROMs for the SCSI Sidecar
To complete your Amiga 1000 SCSI Sidecar, you’ll need to program the PALs (scsi_u1.pld, scsi_u2.pld, scsi_u10.pld) and the EPROMs. Using tools like the TL-866 programmer, you can burn the files onto GALs and 27C128 EPROMs. These components are crucial for the device to function properly and allow your Amiga to communicate with external SCSI devices.
Assembling the SCSI Sidecar: Edge Connector and Jumper Settings
Once your components are ready, you’ll need to solder an 86-pin edge connector to the board. This connector plugs into the Amiga’s sidecar slot. Make sure to use a connector with the correct tail length of 2.54cm (1 inch) to ensure it fits properly.
After installing the edge connector, adjust jumper J6 near the SCSI connector to the “A” position. This is important for ensuring the correct setup.
Testing the SCSI Sidecar: Getting It Up and Running
With the SCSI Sidecar assembled, plug it into the Amiga’s sidecar slot, and set the rear switch to the “HD boot” position. Power up the Amiga. You should see the screen cycle through colors as it searches for the SCSI disk. Ensure your external SCSI drive is set to ID0 for booting.
If the system fails to boot or enters a loop, you may need to use a tool like the Kickstart Eliminator or ensure you’re running Kickstart 1.3. Troubleshoot by checking the error codes, which will help you identify specific issues with the SCSI bus or drive.
Key Features of the Amiga SCSI Sidecar
The heart of the Amiga 1000 SCSI Sidecar is the WD33C93 SCSI controller, which connects your Amiga to the SCSI bus. The device also includes a real-time clock (RTC) chip, which can be enabled or disabled via the configuration register.
The card features an Autoconfig system, which allows the Amiga to automatically detect and configure the device upon startup. The ROM and device registers are mapped to the correct addresses, making the SCSI Sidecar a seamless upgrade.
Conclusion: Upgrade Your Amiga 1000 with the SCSI Sidecar
The Amiga 1000 SCSI Sidecar is a must-have upgrade for any Amiga 1000 enthusiast. It provides a simple and effective way to connect an external SCSI hard drive, improving your system’s storage capacity and performance. Whether you’re restoring an old machine or looking to enhance its functionality, this SCSI Sidecar offers a great solution.


